Anatomy of a Jupyter Book
A Jupyter Book is a collection of files and folders that together make up the content and structure of your book.
Jupyter Book 2 (JB2) supports both Markdown files and Jupyter Notebooks as content sources.
The structure of the book is specified in the myst.yml file, which is located in the root directory of your book.
This file contains information about the title, author, and other metadata of the book, as well as documents and its structure to build the book itself.
1 2 3 4 5 6 7 8 9 10 11 12 13 14 15# See docs at: https://mystmd.org/guide/frontmatter version: 1 project: id: 7204695b-7485-4989-863c-16cf6e4db155 title: Jupyter Book 2 Workshop Template description: This description goes in the preface of the pdf output. # keywords: [] authors: - name: Freek Pols - name: Luuk Fröling - name: Robert Lanzafame - name: Kirstie Whitaker - name: Jim Madge license: content: CC-BY-4.0
Program 1:The head of this book’s myst.yml
Markdown
Markdown is a simple markup language: plain text that is formatted with small pieces of ‘code’. This allows you to create rich, interactive books that combine text, code, and visualizations. This text can then be quickly exported to various other formats such as PDF, Word, HTML, etc.
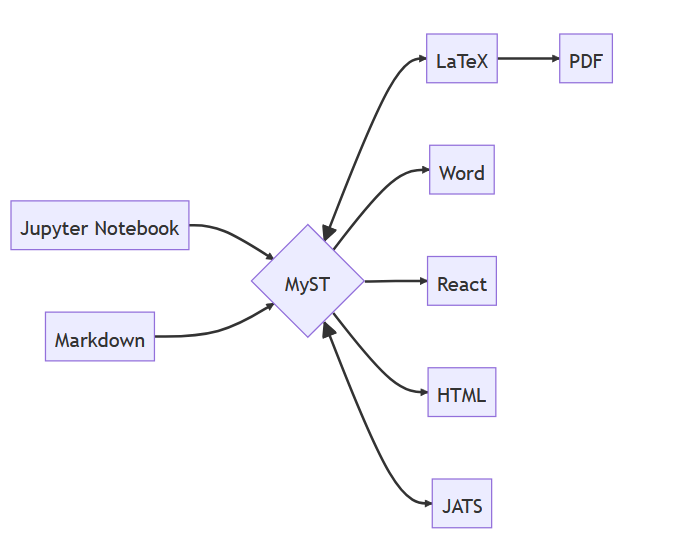
Documents made in MyST Markdown can be converted to many different formats. These can be saved as JSON, or rendered to a website (like this one!) or any number of formats including PDF & LaTeX, Word, React, or JATS. Picture taken from the MYST documentation [1].
Your first change
As explained in the previous chapter, your files are on GitHub and the template ensures the book is built. You can make changes directly to the files online in GitHub, and create or upload new files.
Some files are already present in the template book. The folder structure is shown below
41 42 43 44 45 46 47 48 49 50 51 52 53 54 55 56 57 58 59 60 61 62 63 64 65- file: index.md # the landing page - file: content/1_intro.md - file: content/2_cheat_sheet.md - file: content/lessons/your_turn.md # dropdown menu children: - file: content/lessons/0_setup.md - file: content/lessons/1_firstedit.md - file: content/lessons/1_landingpage.md - file: content/lessons/2_nextstep.md children: - file: content/lessons/2a_plugins.md - file: content/lessons/reuse.md - file: content/lessons/executable.md - file: content/lessons/5_workflows.md - file: content/lessons/6_pdfoverview.md children: - file: content/lessons/6a_myst.md - file: content/lessons/6b_pdfgeneration.md - file: content/lessons/6c_pdfoutput.md # - file: content/lessons/6d_typsttemplate.md # - file: content/lessons/7_styling.md - file: content/lessons/8_init.md - file: content/advanced_start.md - file: content/software.md
Program 2:The Table of Contents (ToC) for this book.
We will now make a small change to one of the files and then look at the result of that change.
Commit summary
If you are working with multiple people in GitHub, or on a large project yourself, it is wise to give the commit a recognizable title (commit message) and optionally add a summary (extended description) of exactly what was changed, see also this more elaborative description. This way, you can detect and undo any errors early. You can also explain why certain changes were made.
Adding a page
The Table of Contents defines the structure of your Jupyter Book.
Items in your myst.yml’s toc will be added to the book’s table of contents.
Markdown, TeX and Jupyter Notebook files will be rendered as pages (in the case of a website) or chapters (in the case of a document).
To add a new page from a Markdown file,
Create a new markdown file
Add some content to the file
Include in the ToC
Using Headings
Similarly to how your table of contents gives structure to your Jupyter Book, within a page you can build structure using headings. You can use levels of headings from 1 to 6 to structure a page.
Essential typography
You should now be confident making changes locally or through the GH IDE. Try making the changes indicated in the following exercise using the solution directive below. Refer to the cheat sheet if you need a reminder on the syntax.
Solution to Exercise 4
Optionally you can put your answers here.